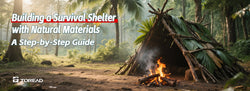
Building a Survival Shelter with Natural Materials: A Step-by-Step Guide

Survival in the wilderness hinges on one critical skill: the ability to construct shelter. Natural materials like branches, leaves, and stones can be transformed into life-saving structures when used strategically. This guide dives into proven techniques for building temporary shelters, supported by expert insights and recommendations for TOREAD outdoor gear to enhance safety and efficiency.


Part 1: Essential Principles of Shelter Building

  1. Location Selection

    • Key Criteria: Avoid flood-prone valleys, dead trees, and animal trails. Prioritize elevated, dry spots with natural windbreaks like rock formations or dense foliage .
    • Example: Use a fallen tree as a windbreak or anchor your shelter against a boulder for stability.
  2. Material Procurement

    • Structural Components:
      • Branches: Select sturdy, straight limbs (10–15 cm thick) for the frame.
      • Leafy Overlays: Pine needles, moss, or large leaves provide insulation and waterproofing .
    • Fasteners: Use vines, strips of bark, or flexible twigs to secure the structure.
  3. Weatherproofing Essentials

    • Waterproofing: Layer leaves with mud or resin-rich plant sap to seal gaps.
    • Ventilation: Create small gaps near the roof to prevent condensation buildup .


Part 2: 4 Types of Natural Shelters

1. Lean-To Shelter

  • Design: Angle branches against a horizontal ridgepole anchored to two trees. Cover with foliage.
  • Use Case: Quick protection from rain/wind; takes 30–60 minutes to build .
  • TOREAD Gear: TOREAD Survival Knife (with serrated edge) for precise branch trimming.

2. Debris Hut

  • Design: Build a A-frame frame and pack it densely with leaves, grass, and moss. Seal the entrance with mud.
  • Use Case: Cold-weather insulation; retains body heat effectively .
  • TOREAD Gear: TOREAD Insulated Poncho to supplement insulation during extreme cold.

3. A-Frame Shelter

  • Design: Cross two long branches to form an "A," then layer smaller sticks and foliage.
  • Use Case: Versatile for moderate climates; doubles as a rain shelter.

4. Snow Cave

  • Design: Dig into deep snow, creating a tunnel for airflow and a dome-shaped chamber.
  • Use Case: Arctic survival; snow acts as a natural insulator.


Part 3: Advanced Techniques for Enhanced Safety

  1. Fire Integration

    • Placement: Build a small fire pit outside the shelter, connected via a stone-lined chimney to avoid smoke ingress.
    • TOREAD Gear: TOREAD HeatResist Camp Mat to protect bedding from radiated heat.
  2. Waterproofing Alternatives

    • Natural Options: Birch bark (impermeable) or large palm fronds for roofing.
    • TOREAD Solution: TOREAD HydroGuard Tarp (20,000mm HH rating) for emergency roof reinforcement.
  3. Security Measures

    • Animal Deterrents: Hang noisy objects (e.g., metal cans) near the entrance.
    • TOREAD Gear: TOREAD SolarBeacon Light to deter nocturnal wildlife.


Part 4: TOREAD’s Survival Gear Essentials

Elevate your shelter-building efficiency with TOREAD’s field-tested equipment:

  1. TOREAD Survival Saw

    • Features: Compact, serrated blade for cutting branches; ergonomic handle for extended use.
    • Use Case: Rapidly process firewood or trim shelter frames.
  2. TOREAD Waterproof Backpack (20L)

    • Innovation:
      • Ripstop nylon + waterproof zipper.
      • Dedicated dry-bag compartment for electronics.
  3. TOREAD ThermoLite Sleeping Pad

    • Benefits:
      • Rigid foam insulation (R-value 3.2) for ground protection.
      • Reflective layer to retain body heat.
  4. TOREAD MultiTool

    • Tools Included: Pliers, saw, bottle opener—ideal for shelter assembly and repairs.


Checklist: Build a Robust Shelter in 6 Steps

  1. Scout for a dry, elevated site.
  2. Gather 20+ sturdy branches and leafy material.
  3. Construct a triangular frame using the Lean-To method.
  4. Layer debris for insulation (aim for 30–45 cm thickness).
  5. Secure edges with vines or TOREAD paracord.
  6. Add a fire pit and water-resistant tarp (TOREAD HydroGuard).


Conclusion


Mastering natural shelter-building transforms survival scenarios from perilous to manageable. By combining time-tested techniques with TOREAD’s durable gear, you’ll gain the confidence to thrive in any wilderness challenge.


Related News
Submit comment
Cart
Close
Back
Account
Close